Published on May 24, 2025
Complete Guide to Evil-WinRM on Kali Linux
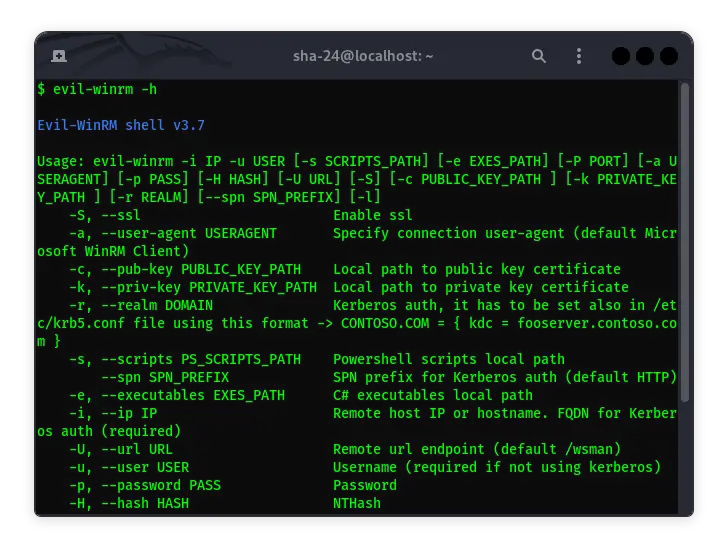
Evil-WinRM is a WinRM (Windows Remote Management) shell specifically designed for hacking and pentesting purposes. WinRM itself is an implementation of the WS-Management protocol by Microsoft , which allows interaction between hardware and operating systems from various vendors through a SOAP-based protocol. This feature makes it easier for system administrators to manage Windows servers. Evil-WinRM utilizes this feature to provide an easy-to-use interface for pentesting activities, especially in the post-exploitation phase.
Key Features of Evil-WinRM
Evil-WinRM offers various features that make the pentesting process easier, including:
- Compatibility with Linux and Windows operating systems: Allows the use of Evil-WinRM on various platforms.
- Load PowerShell scripts into memory: Run scripts without leaving traces on disk.
- Load DLL files and C# assemblies into memory: Helps avoid detection by some antivirus software.
- Pass-the-Hash support: Allows authentication using NTLM hashes without requiring the original password.
- Kerberos authentication support: Enables more secure authentication in domain environments.
- SSL and certificate support: Provides encrypted connections to improve communication security.
- File upload and download feature with progress bar: Facilitates file transfer between local and remote machines.
- WinRM command history and command completion: Improves efficiency by storing command history and providing auto-completion.
- Docker support: Enables the use of Evil-WinRM in Docker containers for better isolation and portability.
Installing Evil-WinRM on Kali Linux
Evil-WinRM can be installed on Kali Linux through several methods:
Method 1: Using the Official Kali Linux Package
Kali Linux provides an Evil-WinRM package that can be installed directly using apt:
sudo apt update
sudo apt install evil-winrm
After installation, you can run Evil-WinRM with the evil-winrm command.
Method 2: Installing via Ruby Gem
If you want to install the latest version or are not using Kali Linux, you can install Evil-WinRM via Ruby Gem:
- Make sure Ruby is installed: Evil-WinRM requires Ruby version 2.3 or higher.
- Install Evil-WinRM:
gem install evil-winrm
- Run Evil-WinRM:
evil-winrm
Method 3: Using Docker
Evil-WinRM is also available as a Docker image, allowing you to run it in a container:
- Pull the Docker image:
docker pull oscarakaelvis/evil-winrm
- Run the container:
docker run --rm -ti --name evil-winrm oscarakaelvis/evil-winrm
Using Evil-WinRM
Once installed, you can use Evil-WinRM to access a shell on a Windows machine that has WinRM enabled. Make sure you have valid credentials and the appropriate permissions.
Basic Usage Example
To connect to a Windows host with the IP address 192.168.1.100, using the username Administrator and the password MySuperSecr3tPass123!, run the following command:
evil-winrm -i 192.168.1.100 -u Administrator -p 'MySuperSecr3tPass123!'
Once connected, you will be presented with an interactive PowerShell prompt that allows you to run commands on the target machine.
Additional Options
Evil-WinRM provides a variety of options to customize your connection:
- Using SSL: To enable an encrypted connection, add the
-Sor--ssloption. Make sure the appropriate port (usually 5986) is open on the target machine.
evil-winrm -i 192.168.1.100 -u Administrator -p 'MySuperSecr3tPass123!' -S
- Uploading and Downloading Files: You can upload files from your local machine to your remote machine using the
uploadcommand and download files from your remote machine to your local machine using thedownloadcommand.
upload /path/to/file/local.txt C:\path\to\file\remote.txt
download C:\path\to\file\remote.txt /path/to/file/local.txt
- Loading PowerShell Scripts: To load and run PowerShell scripts from a local directory, use the
-sor--scriptsoption when starting Evil-WinRM.
evil-winrm -i 192.168.1.100 -u Administrator -p 'MySuperSecr3tPass123!' -s '/path/to/script/'
Once connected, you can run the script with the command:
.\script_name.ps1
That’s all the articles from Admin, hopefully useful… Thank you for stopping by…

